PAYTAN SOFTWARE USER MANUAL

INTRODUCTION
Paytan software designed with utmost flexibility. It is a sophisticated, comprehensive software package that makes one of the most complex, time-consuming tasks employers face as simple as a few keystrokes.
Paytan is here for you with a guarantee of speed, accuracy, support and compliance. Tanzania's No.1 payroll system that is highly customizable with a secure database which includes an optional HRM module.
Login Page
- Enter your registered login details – email address and password, to Login
- Check Remember me, to make browser to remember your Email address
- Follow Forgot the password? link to reset your password.

Home Page
- Setup Process Links
- Salary Calculator
- Monthly Payroll Links

A:Setup Process
- Go through the listed processes on Figure: 3 in order to start processing your payroll.
- To go back to the home page click Home on the navigation bar or click icon
- Setup your Company: Add relevant details about your company
- Employee Field Definitions: Select fields that should appear on employee’s record form.
- Taxes Setup: Enter PAYE and Employer’s taxes definitions.
- Terms of Service: Add Term of service according to the service period of an employee's contract.
- Departments: Add departments and heads of departments.
- Banks: Add banks to which your employees belong.
- Social Security Fund Settings: Add social security funds that employees belong to.
- Standard Allowance: Add the income given to employees apart from their Salary e.g. House Allowance.
- National Health Insurance Fund: Add NHIF records.
- Add Employees: Add employee records.

Step 1: Set up your Company
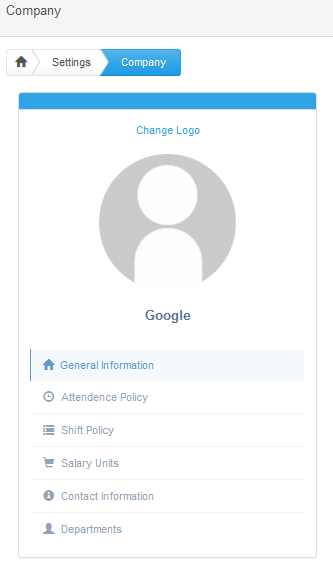
- Click Change Logo to add or change your company’s logo.
- General Information link allows you to enter all the required information about your company.
- Department link allows you to add departments and information pertaining to different departments.
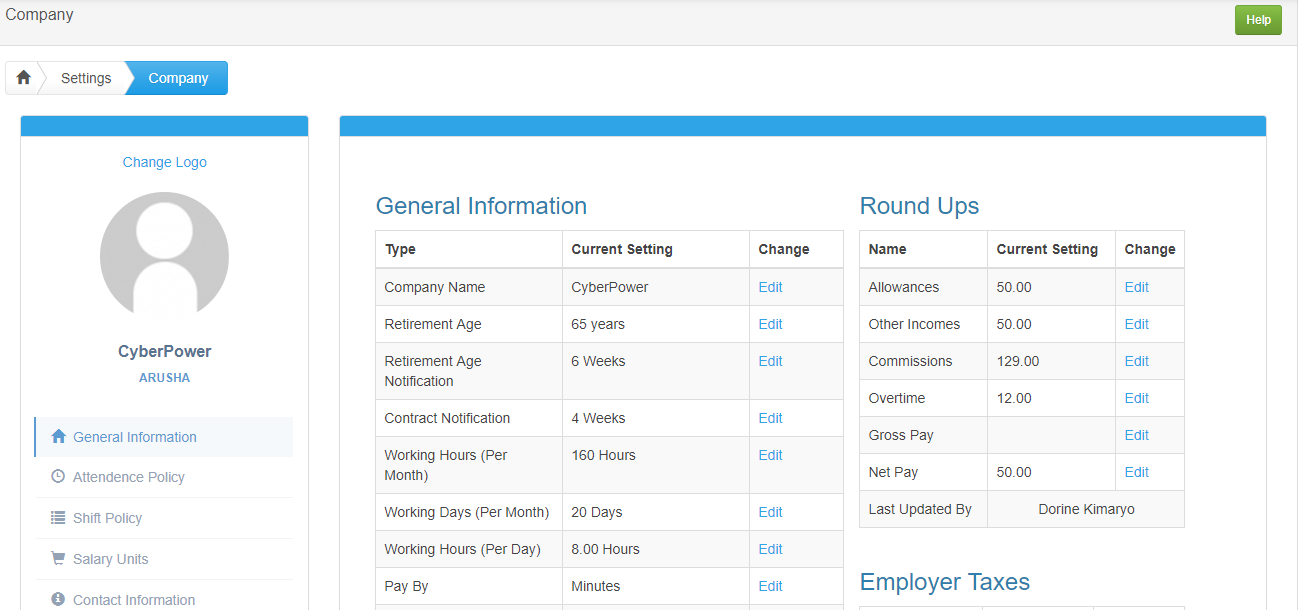
1.1 General Information
Figure 5 displays all the relevant information about your company. To make any changes, click Edit.
1.2 Attendance Policy
Set the maximum earliest time of entering the office and the maximum latest time of leaving the office

1.3 Shift Policy
Set time for Shifts Name, Start Time, Break Start, Break End, End Time and Grace Period
- Delete button removes an entry from the database.

1.4 Salary Units
- Search box allows you to quickly find a Salary Unit definition by typing a specific value.
- Edit allows you to make changes on a specific Salary Unit definition.
- Delete removes an entry from the database.

Add Salary Unit
- Close takes you back to the previous page.
- Save & New button saves then brings a new prompt window to add a new Salary Unit.
- Save & Close button saves and takes you back to the previous page

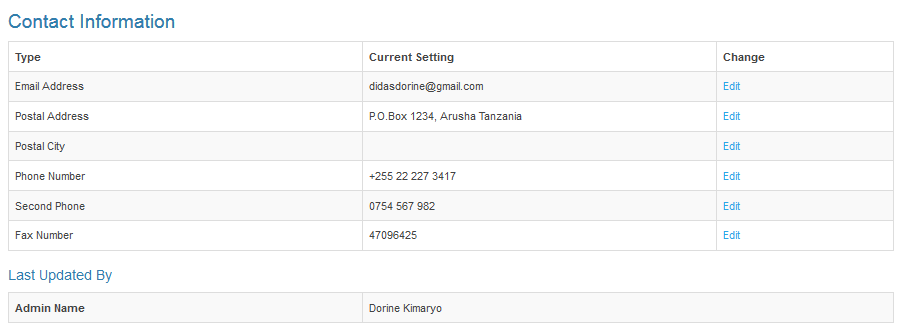
1.5 Contact Information
After you have specified your contact information, you can edit each field by clicking Edit on the particular field you want to change.
1.6 Departments
- Enter the department Name e.g. Production, Sales.
- Head of Department must be selected from list of employees.

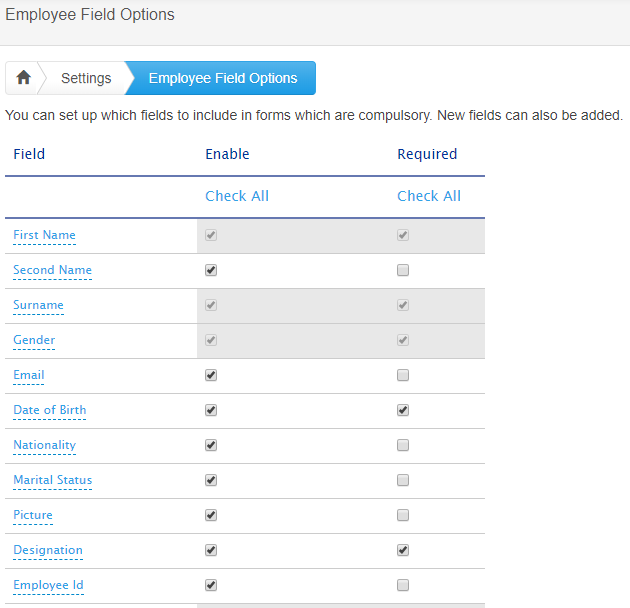
Step 2: Employee Field Options
- Check the box under Enable to display the field on the form.
- Check the box under Required? if the field must be filled
- Click Save to save the changes made
- Select +Add Field to Add field to Employee fields
2.1: Add field to employee
-
Clicking +Add Field will prompt you to add field description and specify if it is Optional/ Required
- Optional – the field can remain empty when adding an employee
- Required – the field must be filled before submitting the form.
- Add will add the new field option
- Click Cancel to go back to the previous page

Step 3: Taxes Setup
Enter taxes definitions for employees and employer
3.1: PAYE Tax definitions
Enter Pay As You Earn (PAYE) tax definitions according to the revenue authority.
- Search box allows you to quickly find a PAYE tax definition by typing a specific value.
- Edit allows you to make changes on a specific PAYE tax definition.
- Delete removes an entry from the database.

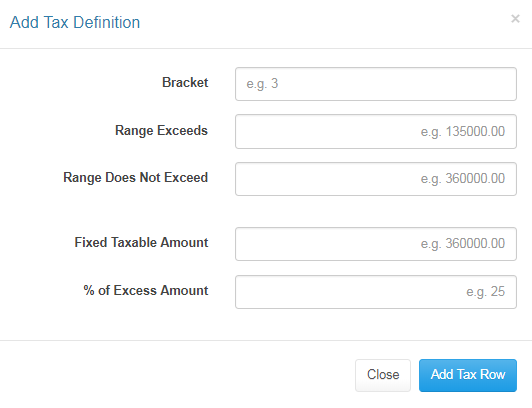
Add tax definition
- Click Add Tax Definition will display page similar to Figure
- Click Close to go back to the previous page
- Add Tax Row to save the tax definitions entered
3.2: Employer Tax Definitions
- Search box allows you to quickly find an employer tax definition by typing a specific value.
- Edit allows you to make changes on a specific employer tax definition.
- Delete removes an entry from the database.

Add Employer tax
- Click Add Employer Tax to add new tax definition
- Close takes you back to the previous page.
- Submit Employer Tax will add the new tax definition.

Step 4: Terms of Service
- Edit allows you to change the details of a particular Term of Service
- Delete removes an entry from the database

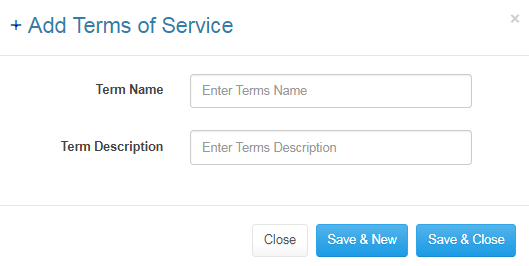
Add term of service
- Add Term of Service button prompts you to add new term of service. Type Term of service details and save.
- Close takes you back to the previous page.
- Save & New button saves then brings a new prompt window to add a new term of service.
- Save & Close button saves and takes you back to the previous page
Step 5: Departments
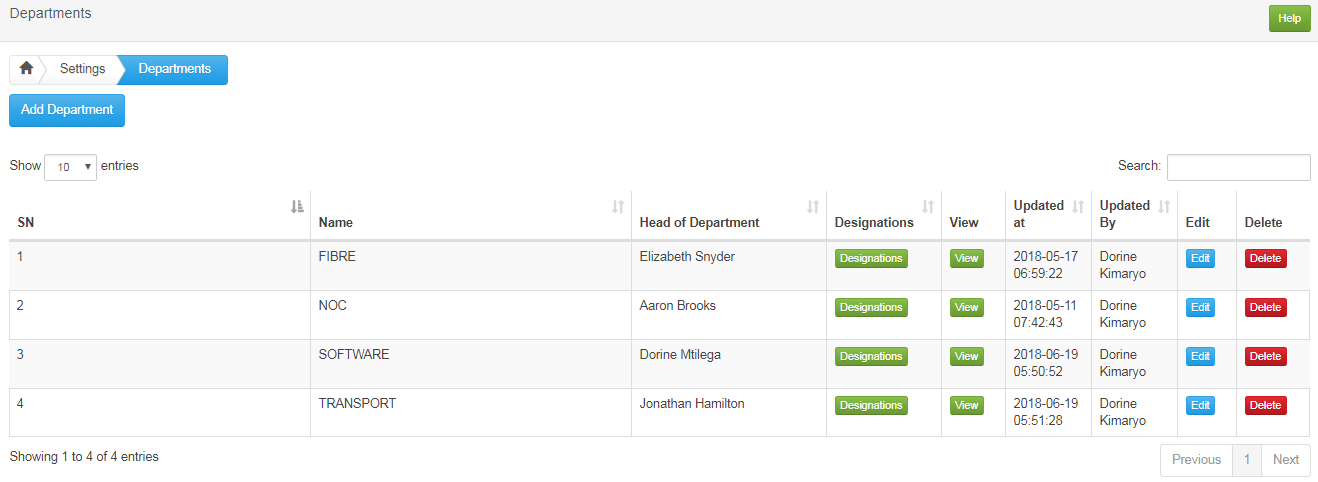
Adding Departments is similar to Setup Process Step 1.6 as shown on Figure 10.
- Search box allows you to quickly find a department by typing a keyword.
- Under Designations click View to see a list of designations found in a particular department.
- Under View, click View to see details of the selected department.
- Click Edit to change details about a particular department
- Delete removes entry from the database.
Step 6: Banks
- Search box allows you to quickly find a bank by typing a keyword.
- View under Branches displays all bank branches specified.
- Edit allows you to change details about the particular bank selected.
- Delete removes the entry from the database

Add Bank
- Add Bank button prompts you to add new bank. Type bank details and save.
- Close takes you back to the previous page.
- Save & New button saves then brings a new prompt window to add a new bank.
- Save & Close button saves and takes you back to the previous page.

Step 7: Social Security Funds Settings
Enter social security funds used by the employees
7.1: Standard Security Funds
- Search box allows you to quickly find a bank by typing a keyword.
- View displays details of selected security fund.
- Edit allows you to change details about the particular bank selected.
- Delete removes the entry from the database

Add Security fund
- Add Security Fund button prompts you to add Name, Description, your employee’s number for a new Security Fund.
- Close takes you back to the previous page.
- Save & New button saves then brings a new prompt window to add a new bank.
- Save & Close button saves and takes you back to the previous page.

7.2: Custom Security Fund
- Add Custom Security Fund button prompts you to add Name, Description, your employee’s number for a new Security Fund.
- Close takes you back to the previous page.
- Save & New button saves then brings a new prompt window to add a new bank.
- Save & Close button saves and takes you back to the previous page.

Step 8: Standard Allowances
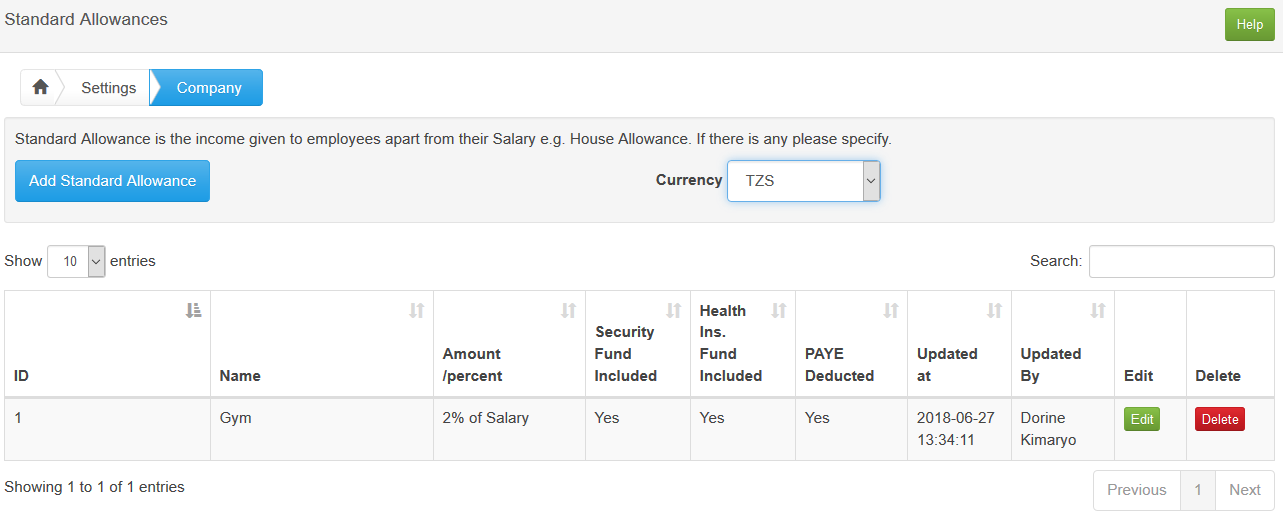
List of Standard Allowances
- Search allows you to quickly find a specific allowance by typing a specific keyword/ value.
- Edit button allows you to change details about the particular allowance selected.
- Delete button removes the entry from the database.
Add New Standard Allowance
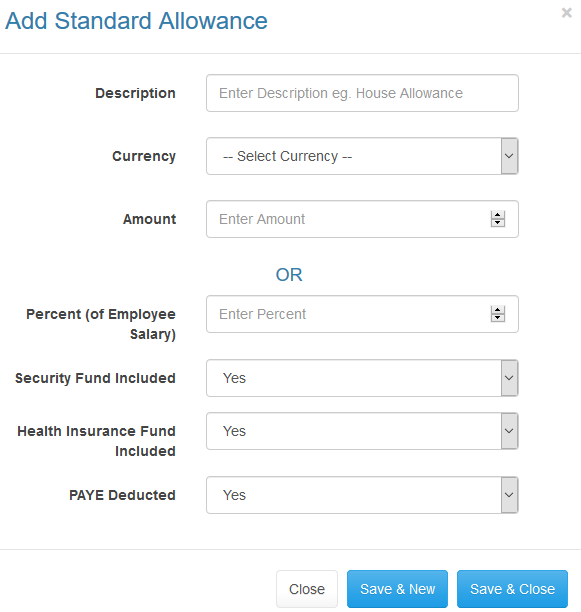
Click + Add Standard Allowance button allows you to specify Description, specific Amount OR Percentage of Employee Salary, Select Yes/No if Security Fund is Included, Select Yes/No if PAYE is Deducted.
- Close takes you back to the previous page without making changes.
- Save & New button saves then brings a new prompt window to add a new standard allowance.
- Save & Close button saves and takes you back to the previous page.
Step 9: National Health Insurance Fund
List of NHIF definitions
- Search allows you to quickly find National Health Insurance Fund definition by typing a specific value.
- Edit button allows you to make changes on a specific NHIF definition.
- Delete button removes the entry from the database.

Add New NHIF definition
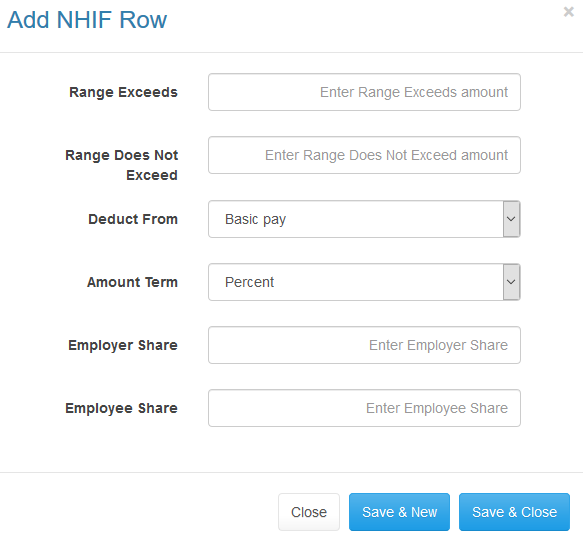
Click +Add NHIF Row button will prompt you to specify Range for NHIF deduction. Select Deduct From > Basic Pay/Net Pay. Select Amount Term > Percent/Amount. Specify Employer Share and Employee Share.
- Close takes you back to the previous page without making changes.
- Save & New button saves then brings a new prompt window to add a new NHIF Row.
- Save & Close button saves and takes you back to the previous page.
Step 10: Add Employees
10.1 Single Record
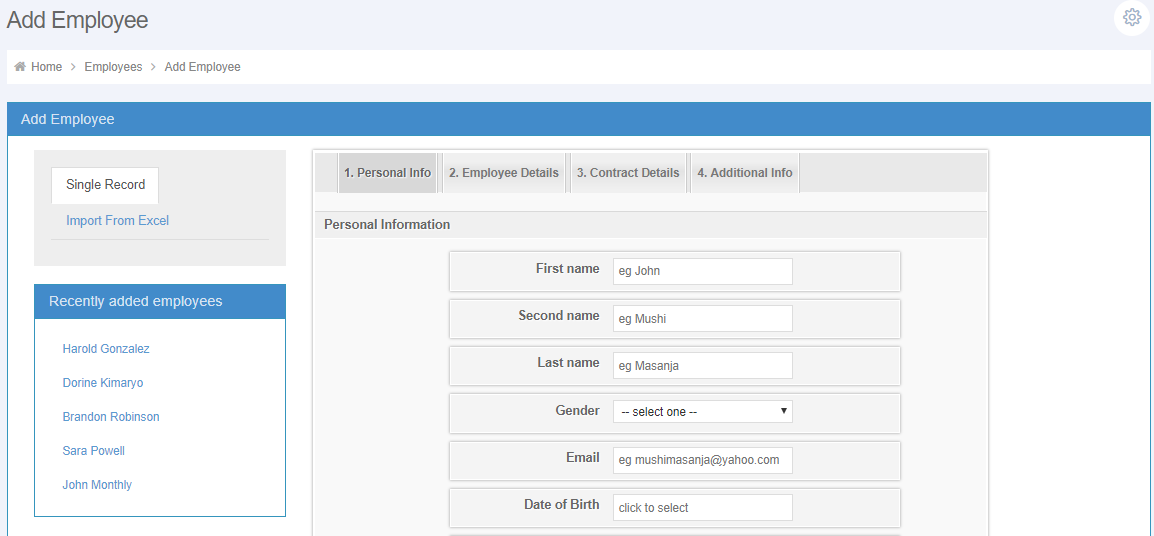
- Navigate through the tabs 1 to 4 to add an employee record.
- The red asterisks (*) mean that the fields must be filled on submission.
10.1.1 Personal Information
Enter employee’s personal information in the form displayed in Figure 30
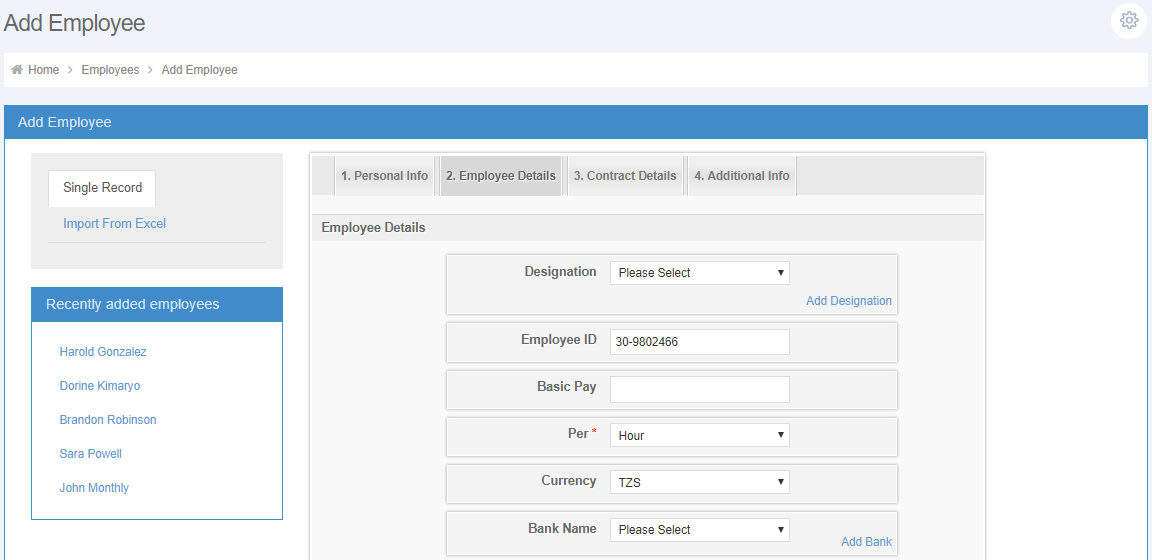
10.1.2 Employee Details
Click the 2.Employee Details tab to add details about an employee.
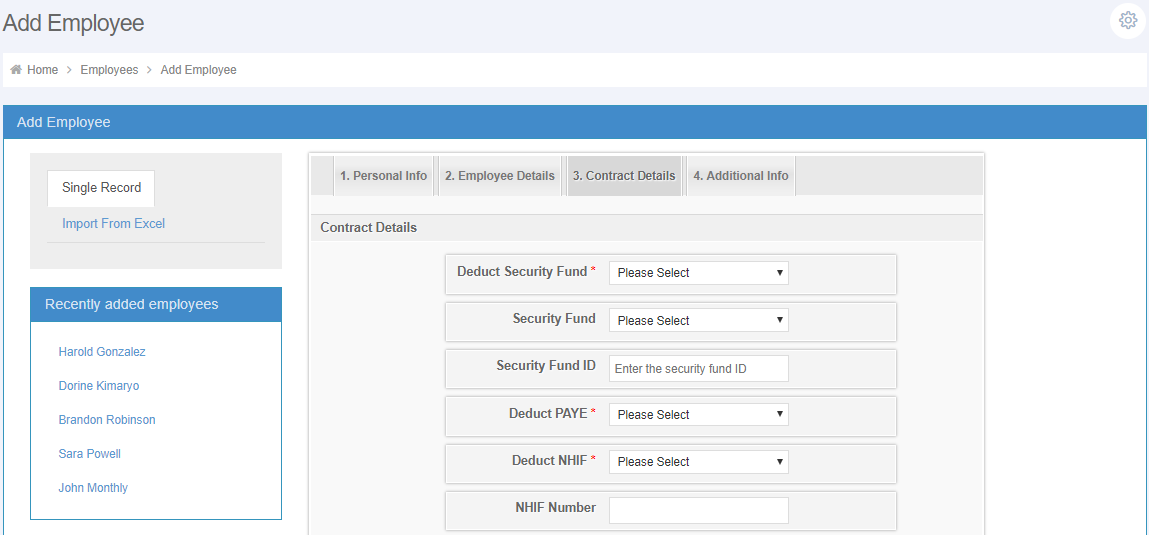
10.1.3 Contract Details
Click the 3.Contract Details tab to add details about an employee’s contract.
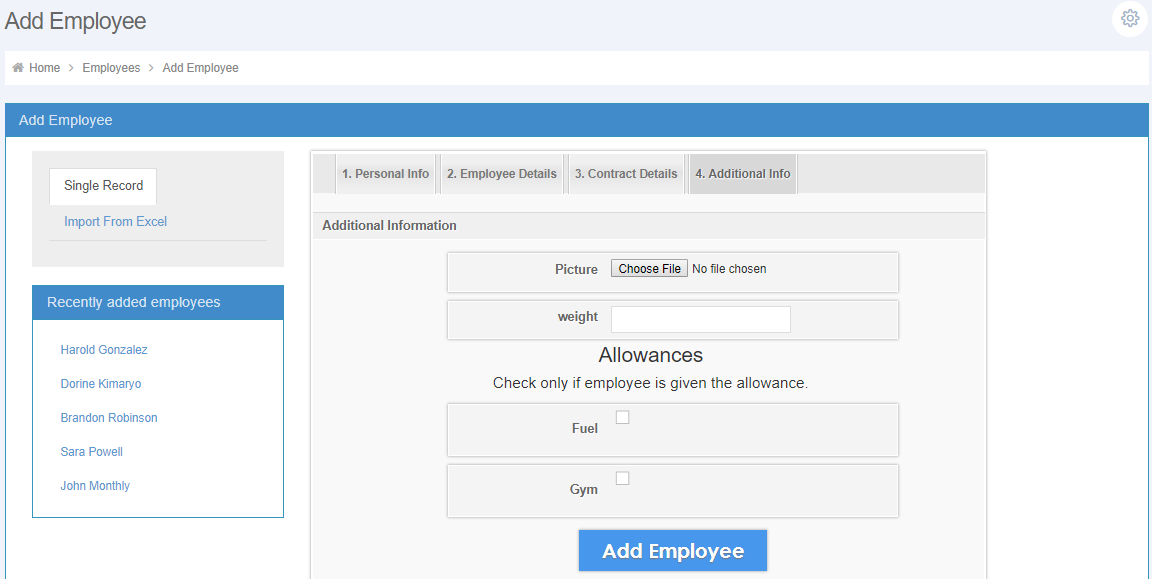
10.1.4 Additional Info
Click the 4.Additional Info tab to additional details about an employee.
Click Add Employee button to save an employee’s detail.
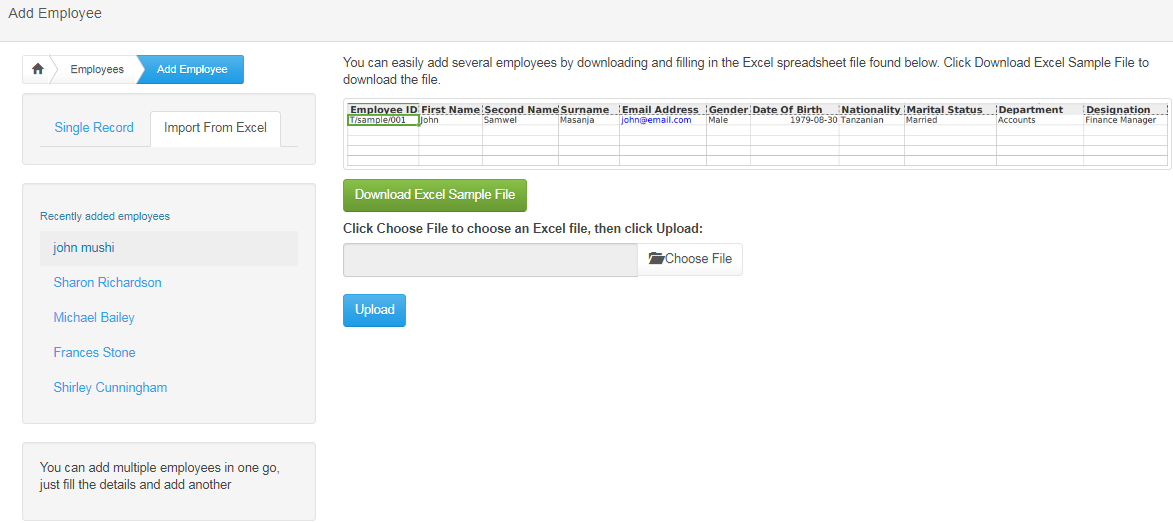
10.2: Import from Excel
Navigate to Import From Excel to add multiple employees from Microsoft Excel spreadsheet.
Payroll Processing
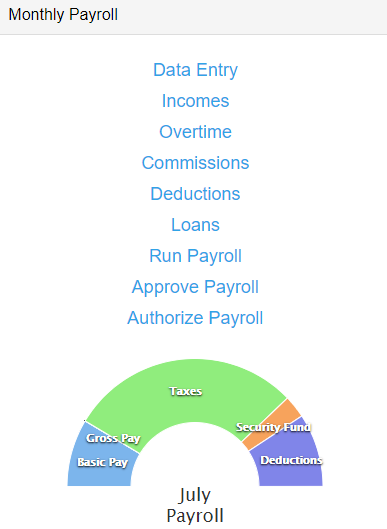
- Run Payroll: Process monthly salary for all employees including other reimbursements and deductions.
- Loans: Manage loans and their deductions from employee’s salary.
- Incomes: Manage allowances apart from the basic salary.
- Overtime: Manage overtime done by employees, dates and the rates.
- Deductions: Manage recurring deductions and one-time deductions.
NOTE: Since payroll processing depends on Deductions, Overtime, Incomes and Loans, it is best to take a bottom up approach starting with Deductions making your way up to Loans then lastly Run Payroll.
Step 1: Data Entry
1.1 Worked Units
- Month helps you to quickly select a specific month by clicking a dropdown button.
- Prev and Next allows you to view the previous employee and the next employee respectively for entering their payroll data.
- View Profile promts you to view and edit a specific employee.
- Pay Slip allows you to print an employee's pay slip inform of PDF.
- Curency allows you to choose which currency should an employee be paid with.
- Compute Monthly Payroll helps you to compute and recompute employee's monthly payroll.

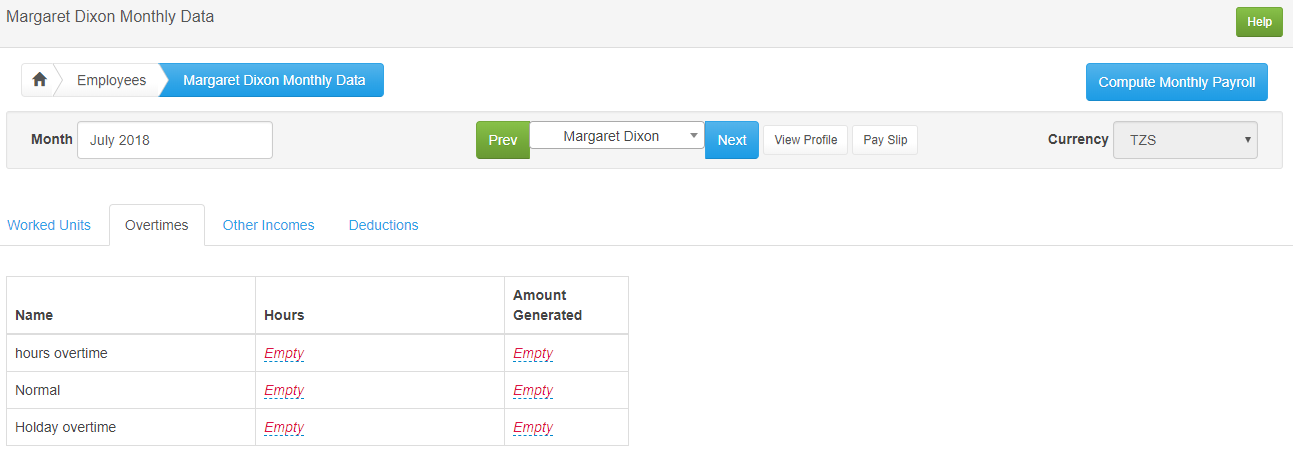
1.2 Overtimes
- Month helps you to quickly select a specific month by clicking a dropdown button.
- Prev and Next allows you to view the previous employee and the next employee respectively for entering their payroll data.
- View Profile promts you to view and edit a specific employee.
- Curency allows you to choose which currency should an employee be paid with.
1.3 Incomes
- Month helps you to quickly select a specific month by clicking a dropdown button.
- Prev and Next allows you to view the previous employee and the next employee respectively for entering their payroll data.
- View Profile promts you to view and edit a specific employee.
- Curency allows you to choose which currency should an employee be paid with.

1.4 Deduction
- Month helps you to quickly select a specific month by clicking a dropdown button.
- Prev and Next allows you to view the previous employee and the next employee respectively for entering their payroll data.
- View Profile promts you to view and edit a specific employee.
- Curency allows you to choose which currency should an employee be paid with.

Step 2: Incomes
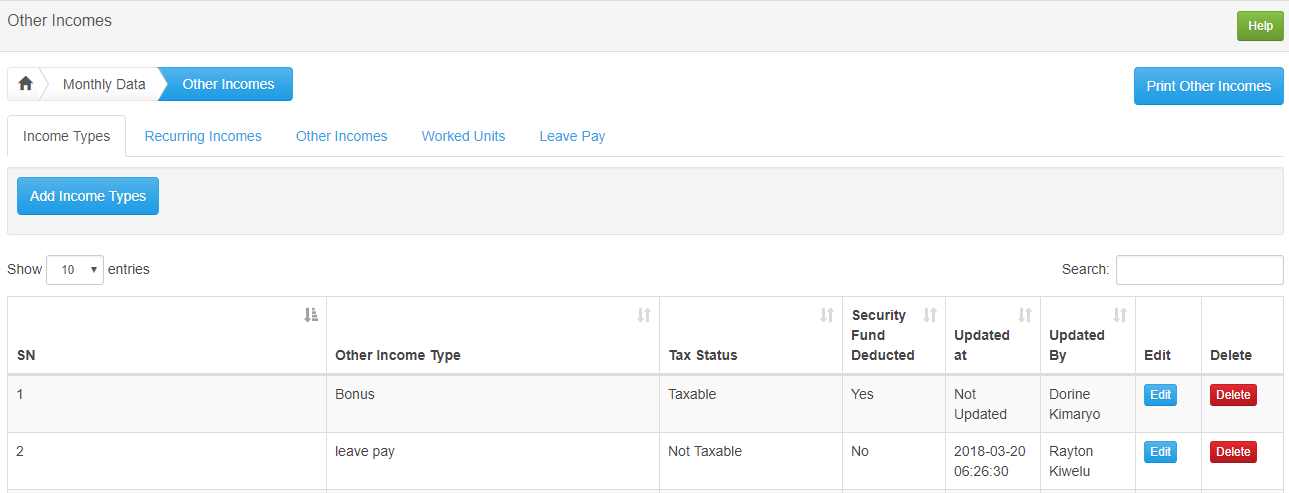
2.1: Income Types
- Search box allows you to quickly find type of income by typing a keyword.
- Edit button allows you to change details about the particular income selected.
- Delete button removes the entry from the database.
2.2 Recurring Incomes
- Search box allows you to quickly find recurring incomes by typing a keyword.
- Edit button allows you to change details about the particular recurring income selected.
- Delete button removes the entry from the database.

2.3 Incomes
- View By Month displays list of OIncomes s of selected month.
- Search box allows you to quickly find incomes by typing a keyword.
- Edit button allows you to change details about the particular income selected.
- Delete button removes the entry from the database.

2.3 Worked Units
- View By Month displays list of Incomes s of selected month.
- Search box allows you to quickly find incomes by typing a keyword.
- Edit button allows you to change details about the particular income selected.
- Delete button removes the entry from the database.

2.3 Leave Pay
- View By Month displays list of Incomes s of selected month.
- Search box allows you to quickly find incomes by typing a keyword.
- Edit button allows you to change details about the particular income selected.
- Delete button removes the entry from the database.

Step 3: Overtimes
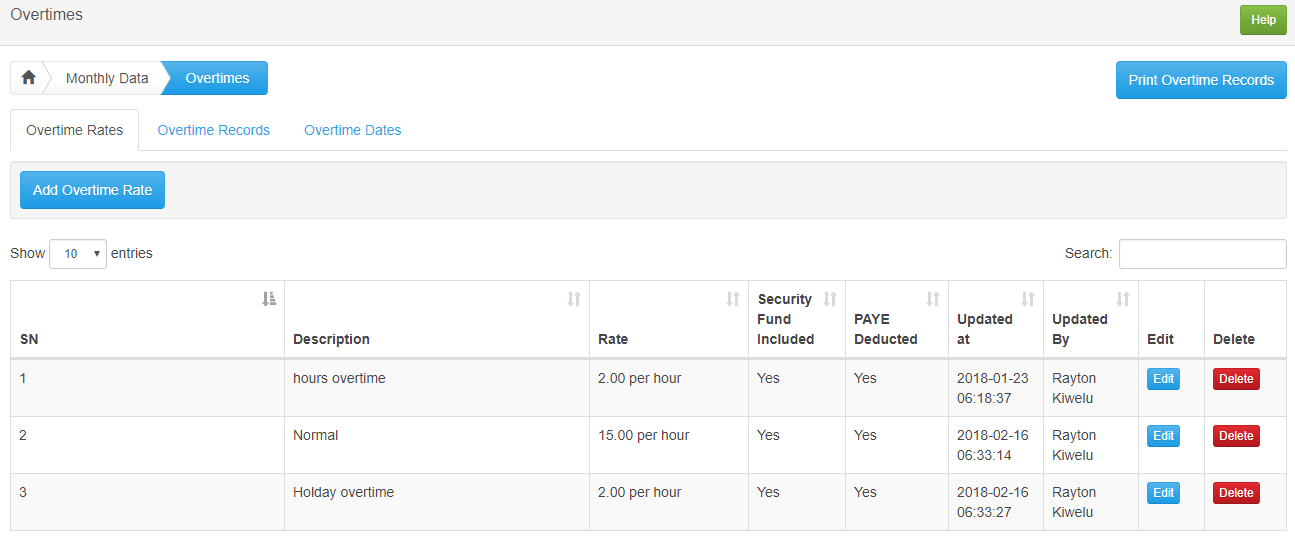
3.1 Overtime Rates
- Search box allows you to quickly find an overtime rate by typing a keyword.
- Edit button allows you to change details about the particular overtime rate selected.
- Delete button removes the entry from the database.
3.1.1 Add Overtime Rate
- Add Overtime Rate button prompts you to type in the Description, value for Overtime rate, select whether Security fund is Included and PAYE is deducted.
- Close button takes you back to the previous page.
- Add Overtime Rate button saves the details and takes you back to the previous page.

3.2 Overtime Records
Click on Overtime Records tab to view Records that employees worked overtime.
- Click on Monthly Overtime button to see a monthly view of Overtime Records.
- Click on Day Range Overtime button to view daily overtime records.

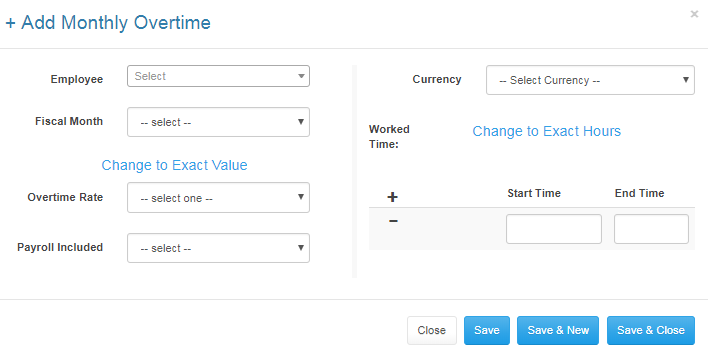
3.2.1 Add Monthly Overtime
- Close button takes you back to the previous page.
- Save & New button saves then brings a new prompt window to add a new Monthly Overtime.
- Save & Close button saves and takes you back to the previous page.
3.2 Overtime Dates
Click on Overtime Dates tab to view Dates that employees worked overtime.
- Use the left and right arrows to go to different months
- Click on Month button to see a monthly view of Overtime Dates.
- Click on Day button to view daily overtime dates.

3.4 Print Overtime
- Print Overtime records button prompts you select Overtime Type, select Term of Service and Month.
- Close button takes you back to the previous page without printing.
- Print PDF button generates a PDF file from your selections.

Step 4: Commissions
4.1 Commission Types
- Search box allows you to quickly find a commission type by typing a keyword.

4.2 Employee's Commission
- View By Month displays list of Other Commissions of selected month.
- Curency allows you to choose which currency should an employee be paid with.

Print Commission
- Close button takes you back to the previous page.

Step 5: Deductions
5.1 Deduction Types
- Search box allows you to quickly find a deduction by typing a keyword.
- Deductions Types Tab to specify types of deductions.
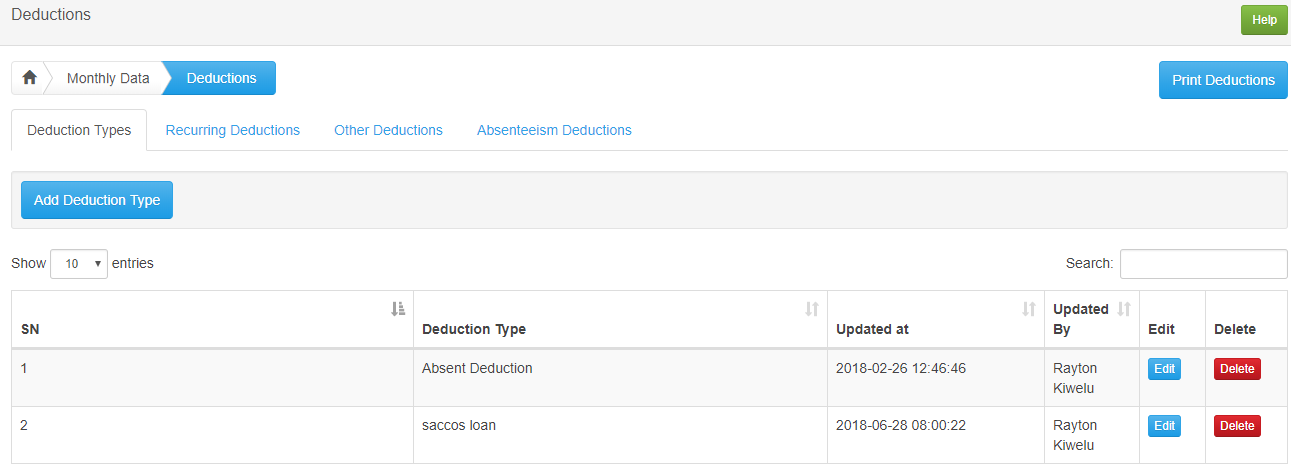
Add Deduction Type
- Add Deduction Type button prompts you to type Name for a new Deduction Type.
- Close button takes you back to the previous page.
- Save & New button saves then brings a new prompt window to add a new deduction type.
- Save & Close button saves and takes you back to the previous page.

5.2 Recurring Deductions
Recurring Deductions are deducted every month.
Add Recurring Deduction button Prompts you to select Deduction Name, select an Employee and type the Amount to be deducted.
- Click on Monthly Overtime button to see a monthly view of Reccurring Deduction.
- Click on Day Range Overtime button to view daily Reccurring Deduction.
- Close button takes you back to the previous page.
- Save & New button saves then brings a new prompt window to add a new Recurring Deduction.
- Save & Close button saves and takes you back to the previous page.
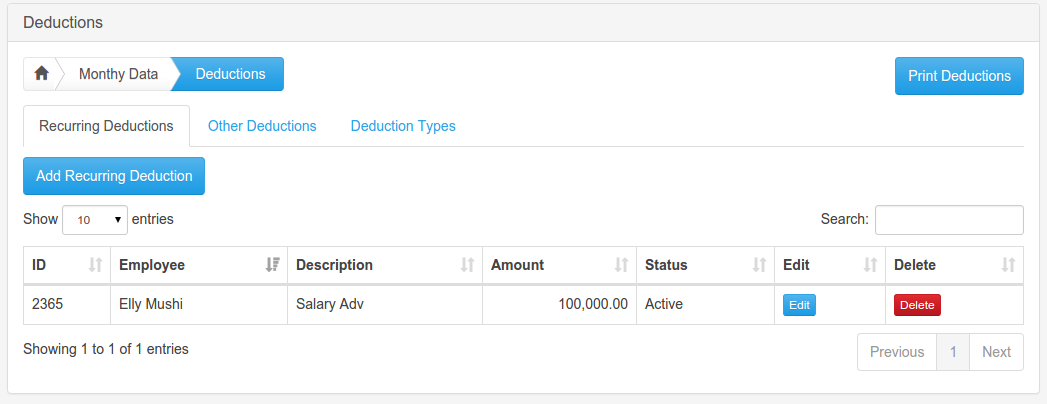
Add Recurring Deduction
- Click on Monthly Recurring Deduction button to see a monthly view of Reccurring Deduction.
- Click on Day Range Recurring Deduction button to view daily Reccurring Deduction.
- Add Monthly Recurring Deduction button Prompts you to select Deduction Name, select an Employee and type the Amount to be deducted.
- Close button takes you back to the previous page
- Save & New button saves then brings a new prompt window to add a new Recurring Deduction
- Save & Close button saves and takes you back to the previous page.

5.3 Other Deductions
Click on Other Deductions button to add one-time deductions.
- Click on Monthly Other Deduction button to see a monthly view of Other Deduction.
- Click on Day Range Other Deduction button to view daily Other Deduction.
- View By Month displays list of Other Deductions of selected month.
- Search box allows you to quickly find a deduction by typing a keyword.
- Edit allows you to change details about the particular deduction selected.
- Delete removes the entry from the database

Add Monthly Other Deduction
Other Deductions deducts one-time deductions.
- Add Monthly Other Deduction button Prompts you to select Fiscal Month, select Deduction Name, select an Employee and type the Amount to be deducted.
- Close button takes you back to the previous page
- Save & New button saves then brings a new prompt window to add a new deduction
- Save & Close button saves and takes you back to the previous page.

Print Monthly Other Deductions
- Print Monthly Other Deductions button prompts you select Deduction Type, Employee Type and Month.
- Close takes you back to the previous page.
- Print Deductions generates a PDF file for your selections.
5.4 Absenteeism Deductions
Add Monthly Absenteeism Deduction
- Close takes you back to the previous page.
- Save & New button saves then brings a new prompt window to add a new monthly Deduction.
- Save & Close button saves and takes you back to the previous page.

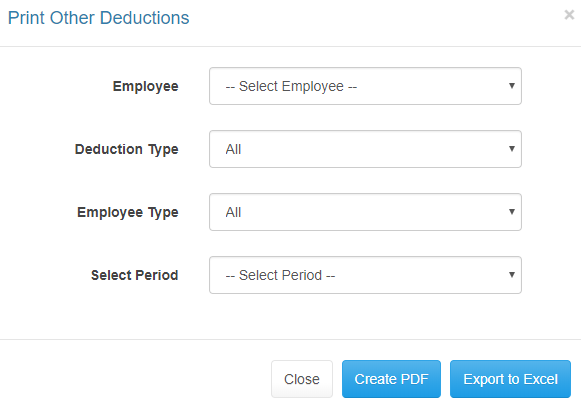
Print Deduction
- Print Deductions button prompts you select Deduction Type, Employee Type and Select Period.
- Close takes you back to the previous page.
- create PDF generates a PDF file for your selections.
- Export to Excel generates a spreadsheet with the details you need.

Step 6: Loans
6.1 Loan Types
- Add Loan Type allows you to add an employee loan type.
- Search box allows you to quickly find recurring income types by typing a keyword.
- Edit button allows you to change details about the particular income selected.
- Delete button removes the entry from the database.

6.2 Loans
- Add Loan allows you to add an employee loan.
- Search box allows you to quickly find recurring income types by typing a keyword.
- Edit button allows you to change details about the particular income selected.
- Delete button removes the entry from the database.

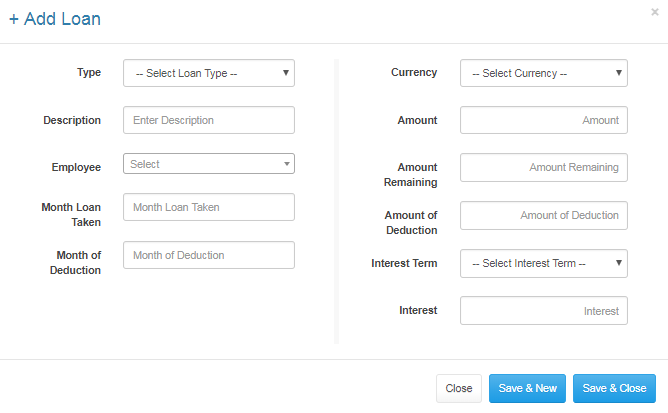
6.1 Add Loan
- Add Loan prompts you to type Description, Amount of loan and Amount of Deduction. You are also required to select Employee, Month Loan taken and Month of Deduction for a new loan.
- Close button takes you back to the previous page without making changes.
- Save & New button saves then brings a new prompt window to add a new loan.
- Save & Close button saves and takes you back to the previous page.
Step 7: Run Payrolls
7.1 Monthly Payroll
- View allows you to view the computed payroll of that month.

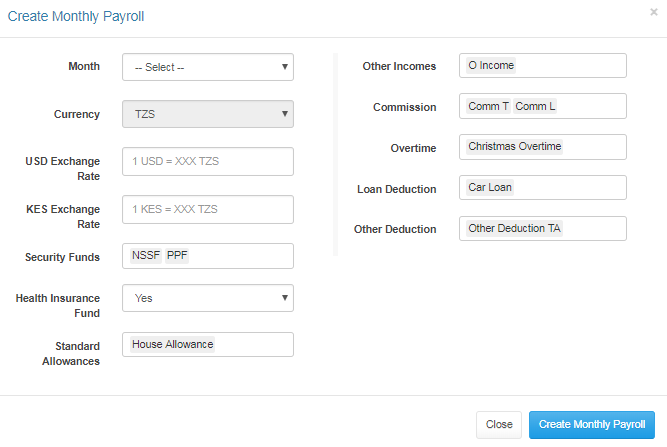
Create Monthly Payroll
- Close takes you back to the previous page without making changes.
- Create Monthly Payroll allows you to create a monthly payroll.
7.1.1 Verify, Approve and Authorize
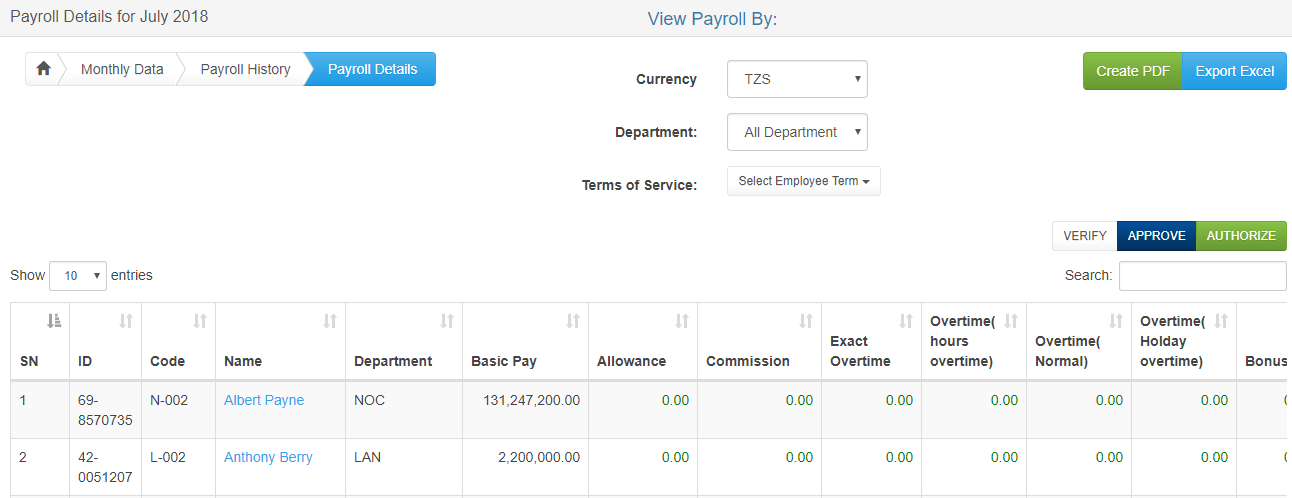
Select Yes or No and it will bring you another page
Here, you can Verify, Approve and/ or Authorize any payroll detail.
7.2 Day Range Pay Run
- Search allows you to quickly view an employee’s income by typing a specific keyword/ value.

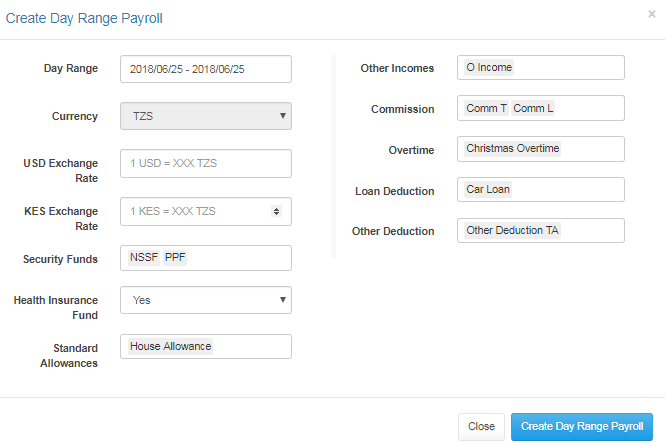
Create Day Range Payroll
- Close takes you back to the previous page without making changes.
- Create Day Range Payroll allows you to create a Day Range payroll.
Salary Calculator
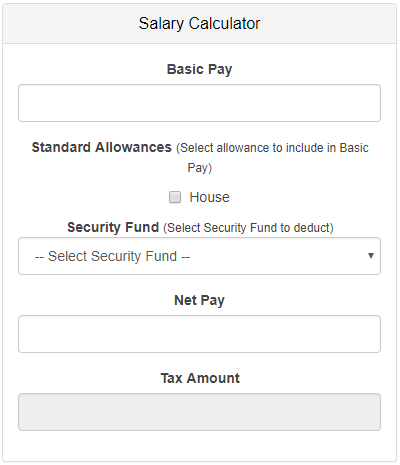
House Allowance and Lunch Allowance are based on the amounts specified under Settings.
-
To calculate Net Pay, enter the amount for Basic Pay:
- Check the boxes for House Allowance and /or Lunch Allowance if given.
- Select the Security Fund which the employee belongs to.
- The amount will be calculated then displayed. Employee’s Tax Amount will be displayed automatically.
- To calculate Basic Pay, enter the amount for Net Pay then follow the steps i and ii above.
Employees
A: Add Employees
Please refer to Setup Process Step 10
B: List all Employees
View Employee By: displays employees according to their term of service.
View displays Employee’s Profile.

1: Employee Profile
- Clicking Employee’s Profile will display selected employee’s information.
- Change Picture link allows you to add/change an employee’s picture.
- Edit link allows you to change details about an employee.

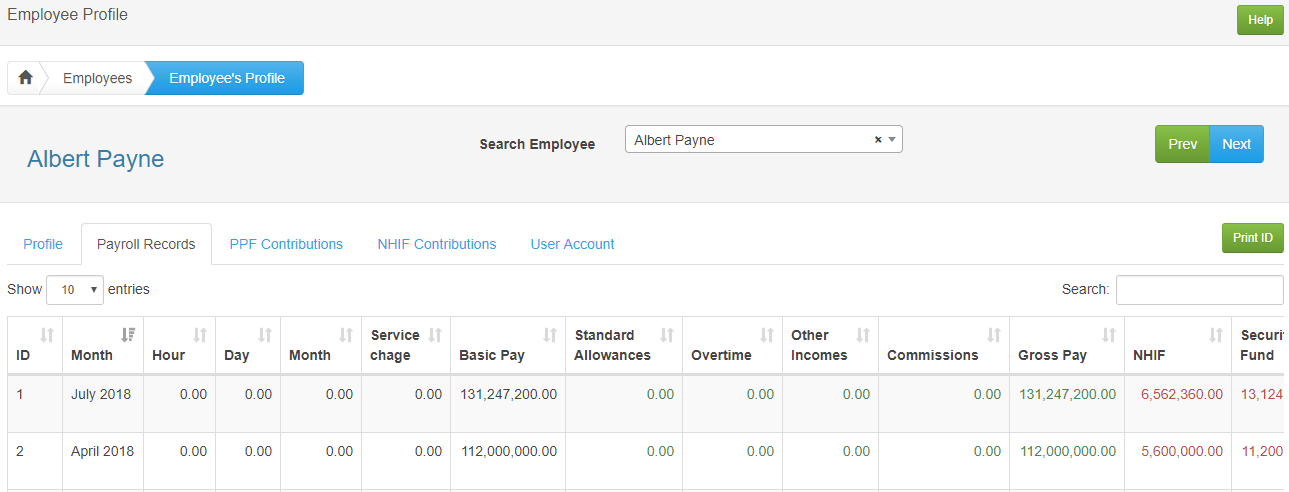
2: Payroll Records
Payroll Records Tab displays monthly salary records for the selected employee.
3: NSSF Contribution
NSSF Contribution tab displays an employee's NSSF records.

4: NHIF Contribution
NHIF Contribution tab displays an employee's NHIF records.

5: User Account
User Account Tab allows you to Activate User Account so he or she can be able to login to the software.

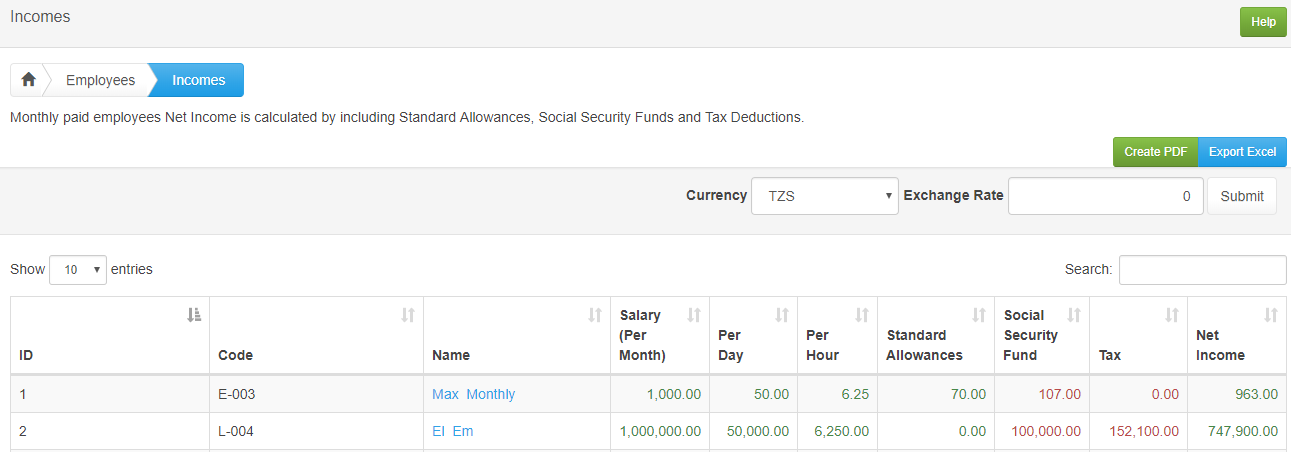
C: Employees’ Incomes
Search allows you to quickly view an employee’s income by typing a specific keyword/ value.
Reports
A: Tax Deductions Report
1: P.A.Y.E Tax
Select Monthly P.A.Y.E Taxes or Day Range P.A.Y.E Taxes according to the details you need.
- Search allows you to quickly find a specific PAYE tax deduction by typing a specific keyword/ value.
- View button displays the selected month’s PAYE tax deductions.

2: Employer Tax
Select Monthly P.A.Y.E Taxes or Day Range P.A.Y.E Taxes according to the details you need.
- Search allows you to quickly find a specific Employer tax deduction by typing a specific keyword/ value.
- View button displays the selected Month’s Employer Tax Deductions.

2.1 Monthly Workers Compensation Fund
View Monthly Workers Compensation Fund

2.2 SDL
View monthly SDL report

2.3 P9
View monthly P9 report

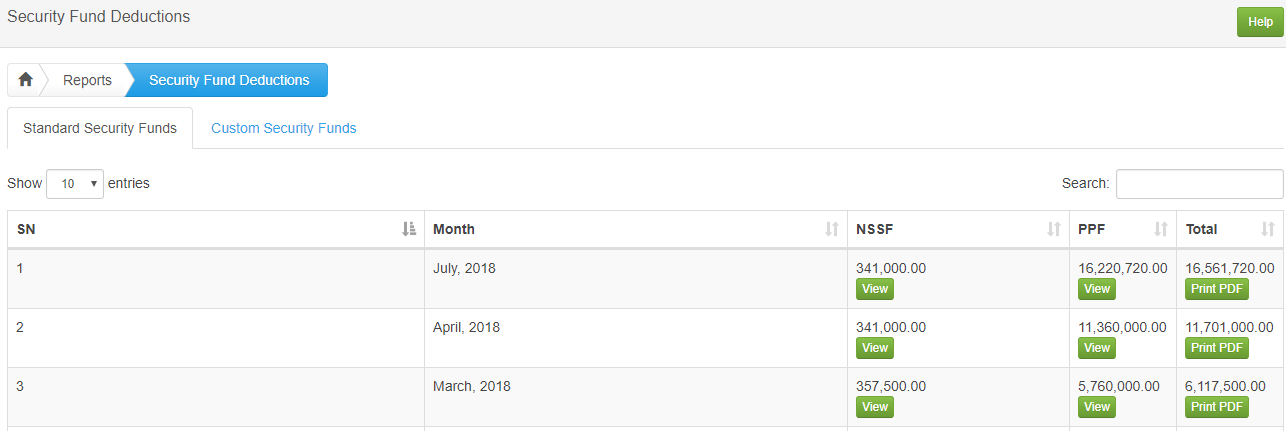
B: Security Fund Deductions
Standard Security Funds
Select Monthly Security Funds or Day Range Security Funds button to see monthly security fund or day range security fund records respectively.
- View button prompts you to see Monthly Records for a selected month records.
- Print PDF allows you to print monthly records.
- Search allows you to quickly find a specific month by typing a specific keyword/ value.
Custom Security Funds
Select Monthly Security Funds or Day Range Security Funds button to see monthly security fund or day range security fund records respectively.
- View button prompts you to see Monthly Records for a selected month records.
- Print PDF allows you to print monthly records.
- Search allows you to quickly find a specific month by typing a specific keyword/ value.

C: National Health Insurance Fund
NHIF Report
Select Monthly NHIF or Day Range NHIF button to see monthly NHIF or day range NHIF records respectively.
- Search allows you to quickly find a specific NHIF Report by typing a specific keyword/ value.
- View displays the selected month’s NHIF report.

D: Pay Slips
Select Monthly Pay Slips or Day Range Pay Slips button to see monthly payslips or day range payslips records respectively.
- Search displays Pay slips for the particular month.
- View allows you to quickly find a specific Pay slip by typing a specific keyword/ value.

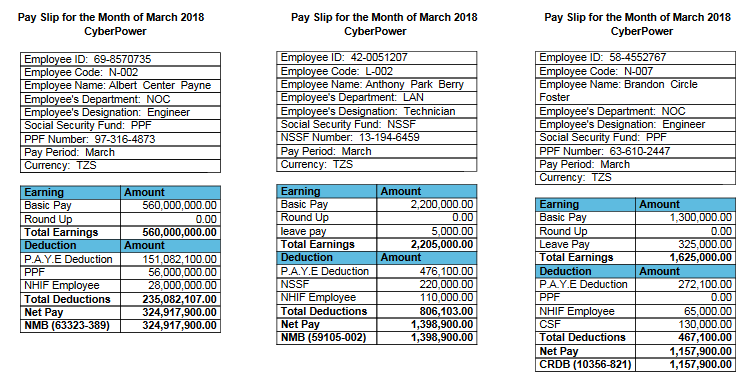
Pay Slip Details
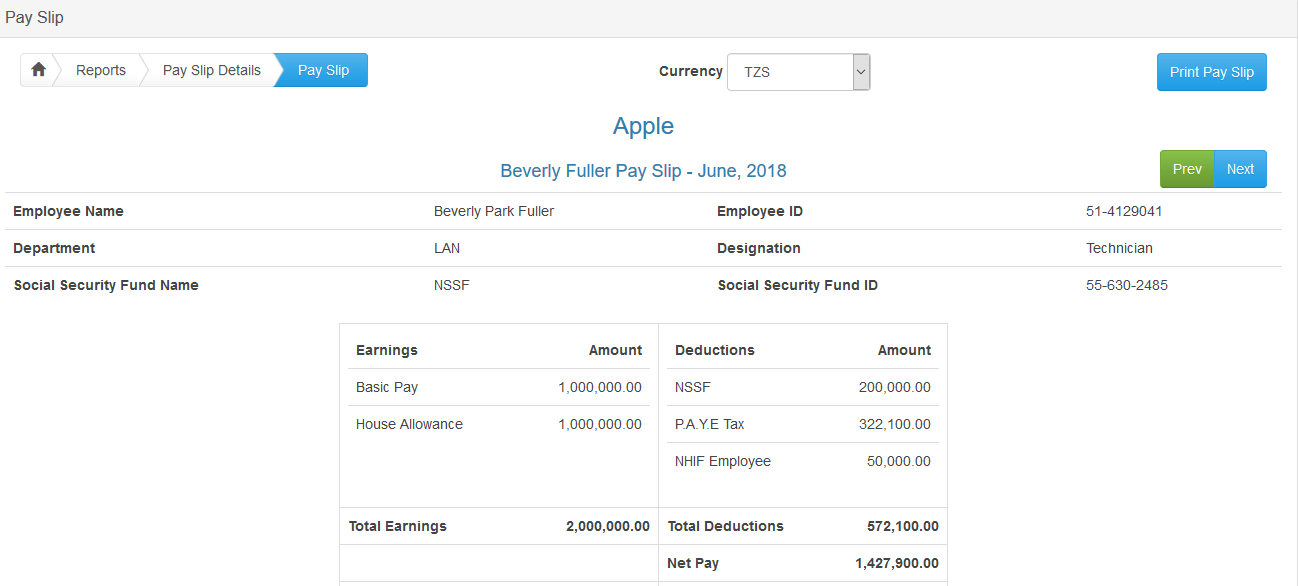
1: View Slips
Click View then click View on View Pay Slip to display details about employee salary as they will appear on his / her pay slip.
1.1 Send Payslip
Fill the fields Subject (Required) and Body (Optional) to send a payslip to a particular employee.

Print Pay Slip
Print Pay slip button generates a PDF file of employee’s pay slip.
2: Slip Status
2.1 Sent Slips
Search allows you to quickly find the sent payslip using a specific keyword / value.

2.2 Unsent Slips
Search allows you to quickly find the unsent payslip using a specific keyword / value.

E: Listings to Banks
Listings to Banks shows all deposits to be made to different banks for every month. It also shows amount paid in cash every month.
Select Monthly Bank Listings or Day Range Bank Listings button to see monthly bank listing or day range bank listing records respectively.

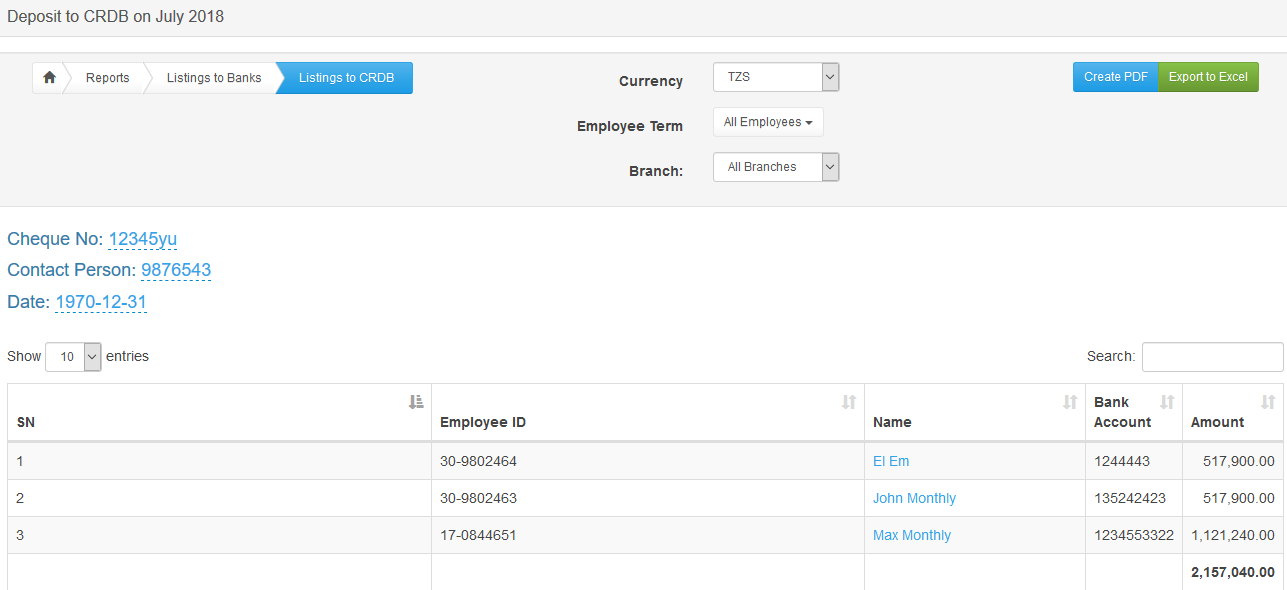
Bank Listings
Clicking View under each listed Bank will display payment details of all employees that belong to the bank.
Search allows you to quickly find the bank listings using a specific keyword / value.
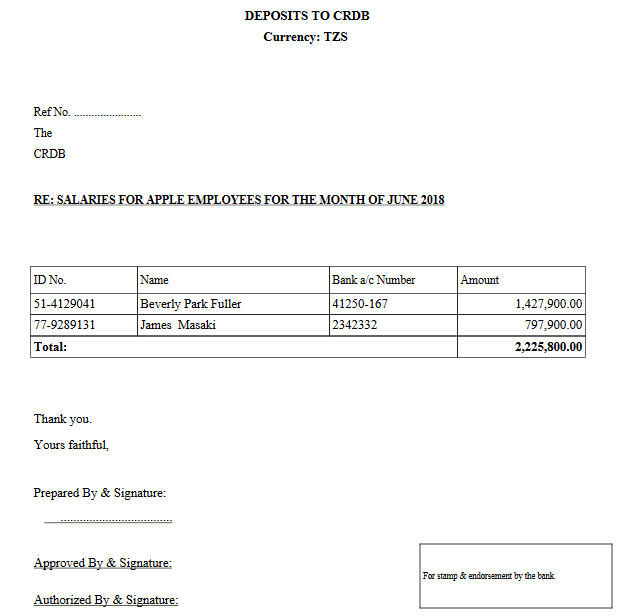
Bank Deposits PDF report
Create PDF button generates a PDF file with Bank Deposits to the selected bank.
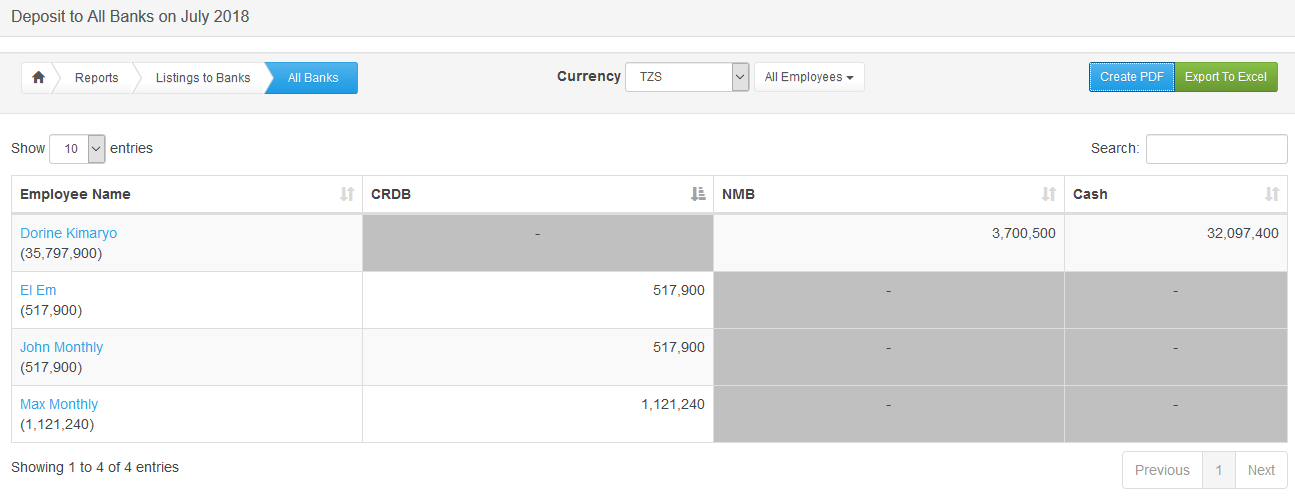
Deposit to all Banks
Click View all button Under All Banks will display all deposits made to each employee’s bank.
Search allows you to quickly find a bank deposit using a specific keyword / value.
Deposit to all Banks PDF report
Create PDF button generates a PDF file that displays all deposits to all banks

F: Summary to Security Funds
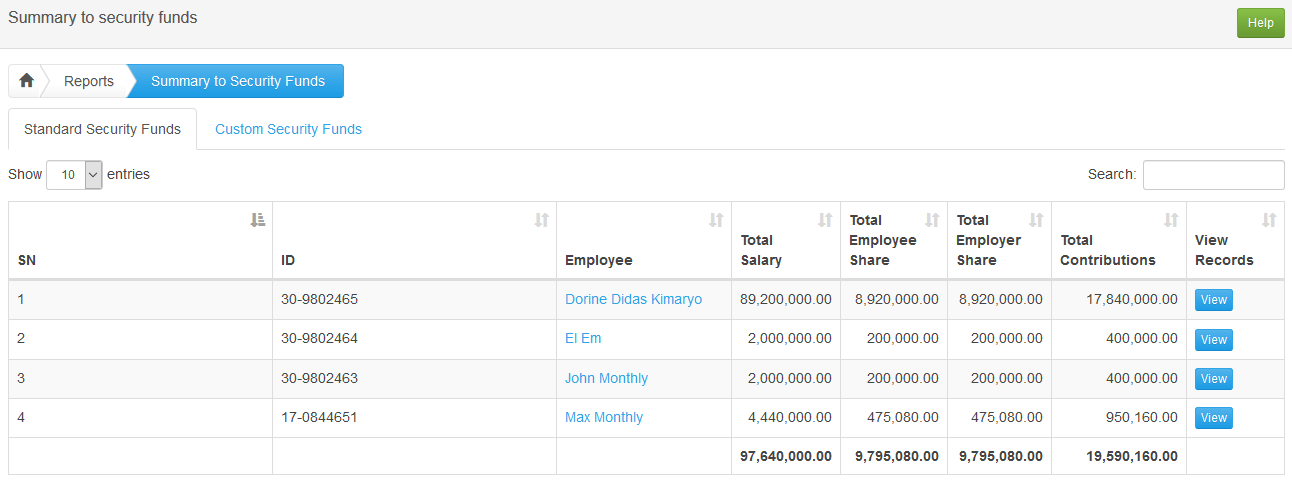
1: Standard Security Funds
Search allows you to quickly find a specific Security fund summary by typing a specific keyword/ value.
View button displays the selected employee’s Security fund summary.
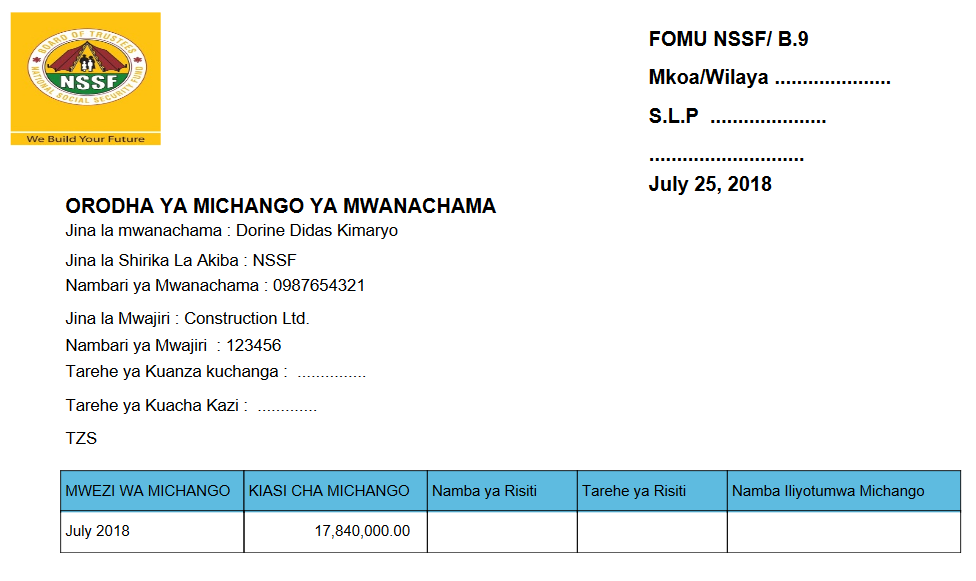
1.1 Specific contributions
View button will display details about the Security fund summary for the particular employee.
Search allows you to quickly find a specific NHIF report by typing a specific keyword/ value

1.2 Specific contributions PDF report
Create PDF button generates a PDF file with all contributions by an employee to a social security fund.
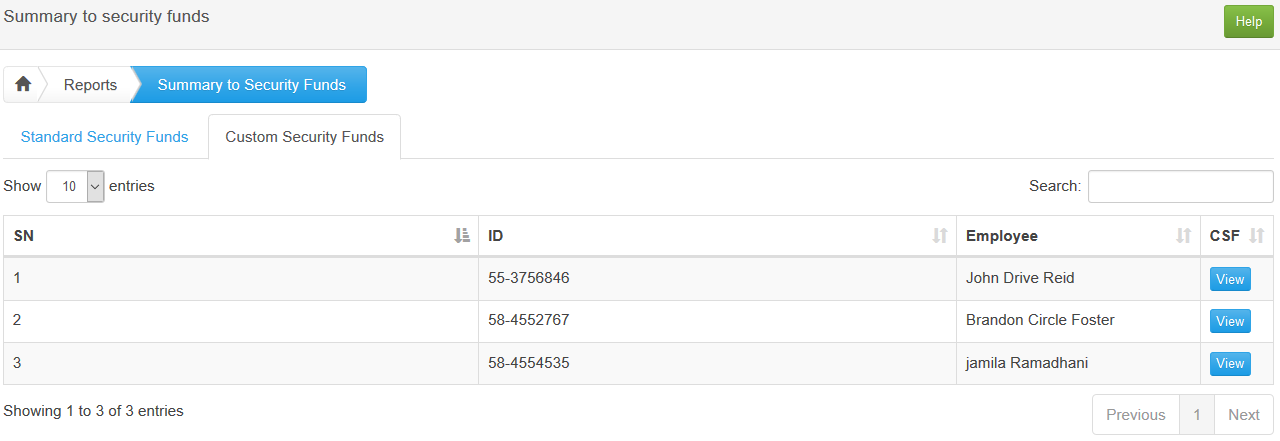
2: Custom Security Fund
Search allows you to quickly find a specific Custom security fund month by typing a specific keyword/ value.
G: Payroll History
Search allows you to quickly find a specific Payroll month by typing a specific keyword/ value.

Payroll Details
Click View under Details in Figure 92 will display Payroll Details for the selected month
View Payroll By allows you to select Employee Type and payroll details will be displayed according to your selection
Search allows you to quickly find a specific Payroll month by typing a specific keyword/ value.
Create PDF button generates a PDF file of the Payroll Details for the selected month.
Export Excel button generates an Excel spreadsheet of the Payroll Details for the selected month

Summary of Payroll History PDF report
Click Summary Report under Summary will generate a PDF summary of payroll details for a specific month.

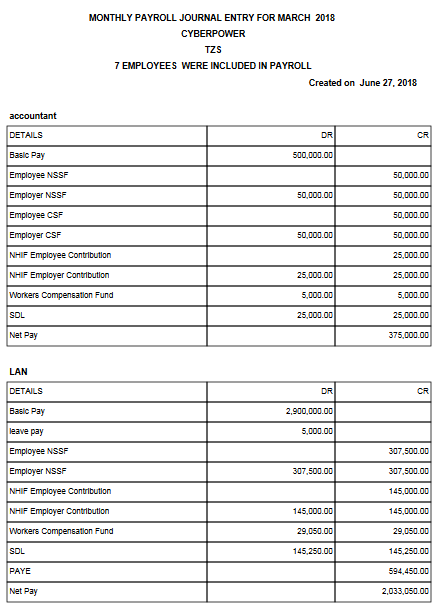
Journal Entry for Payroll History
Click JE Report under Journal Entry will generate a PDF with journal entries details for a specific month.
Print Income and Deduction
Click Print under Income and Deduction will generate a PDF with income and deduction details for a specific month.

Settings
A: Company
Refer to Setup Process Step 1
B: Employee Field Options
Refer to Setup Process Step 2
C: Taxes
Refer to Setup Process Step 3
D: Social Security Funds
Refer to Setup Process Step 7
E: Standard Allowance
Refer to Setup Process Step 8
F: National Health Insurance Fund
Refer to Setup Process Step 9
G: User Accounts
List of Users of Software
- Search allows you to quickly find a specific allowance by typing a specific keyword/ value.
- User Accounts allows you to manage users of the software.
- Activate under Status allows you to activate user account so he/she can be able to login to the software.

User levels and types
- Active Users: shows all users of the system and their user levels/types. The account admins can specify user levels
- Account Admins: these are all users who have all privileges.
- Managers: are employees who are your company’s managers and have access to managerial information.
- Supervisors: are employees who are your company’s supervisors and have access information related to their position.
- View Only Users: These are users who are able to login to the system with least privileges i.e. they cannot change anything.
- Employees: are all employees whose user accounts are active.

H: Departments
Refer to Setup Process Step 5
I: Banks
Refer to Setup Process Step 6
J: Term of Services
Refer to Setup Process Step 4
K: Currencies
- Search allows you to quickly find a specific currency by typing a specific keyword/ value.
- Edit allows you to make changes on a specific Currency.
- Delete removes permanently an entry from the database.
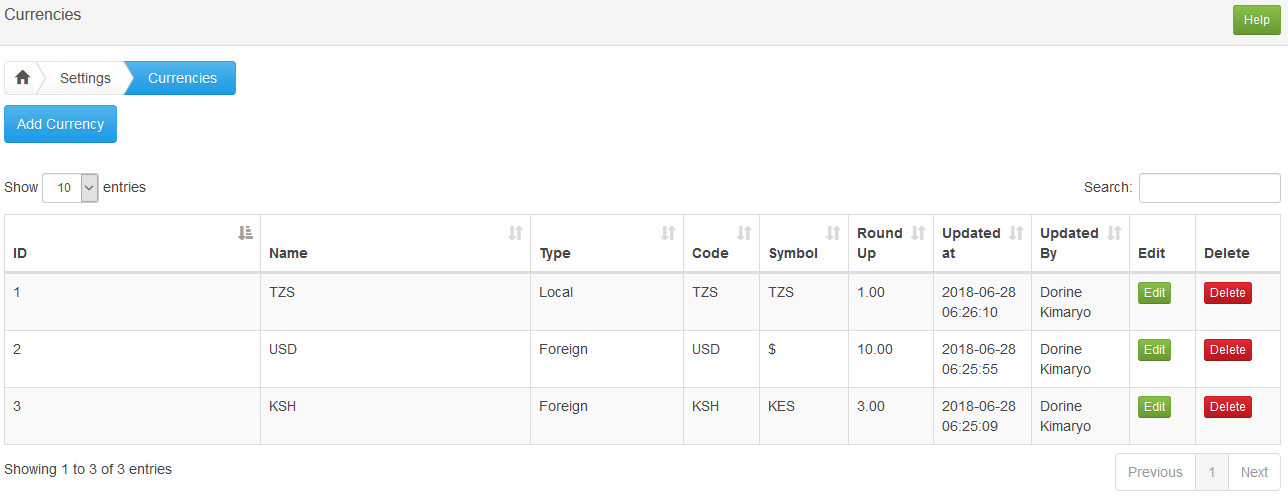
Add Currency
- Close takes you back to the previous page.
- Save & New button saves then brings a new prompt window to add a new Currency.
- Save & Close button saves and takes you back to the previous page

L: Software Intergrations
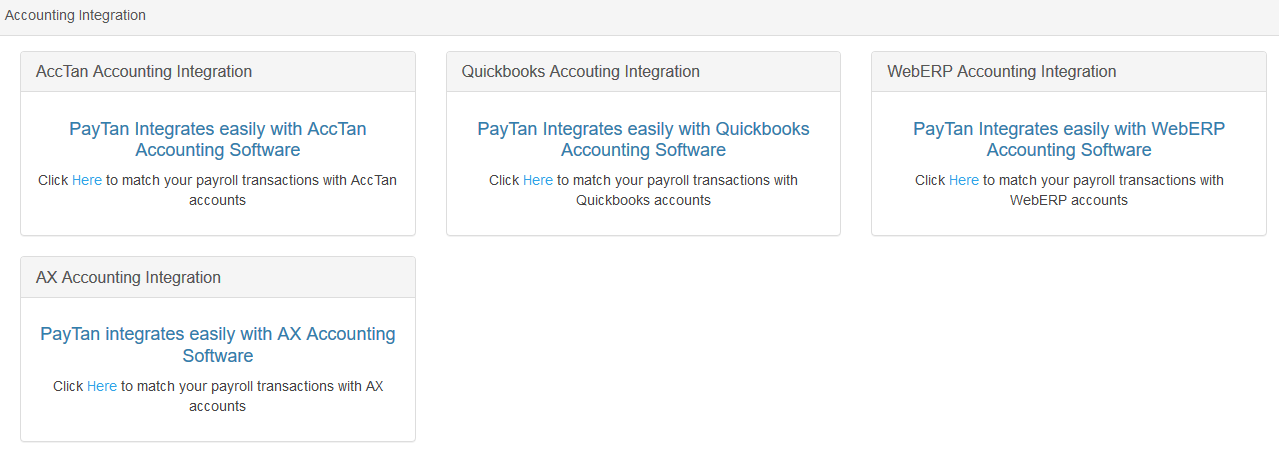
Acctan Accounting Intergration
PayTan Integrates easily with AccTan Accounting Software
Click Here to match your payroll transactions with AccTan accounts

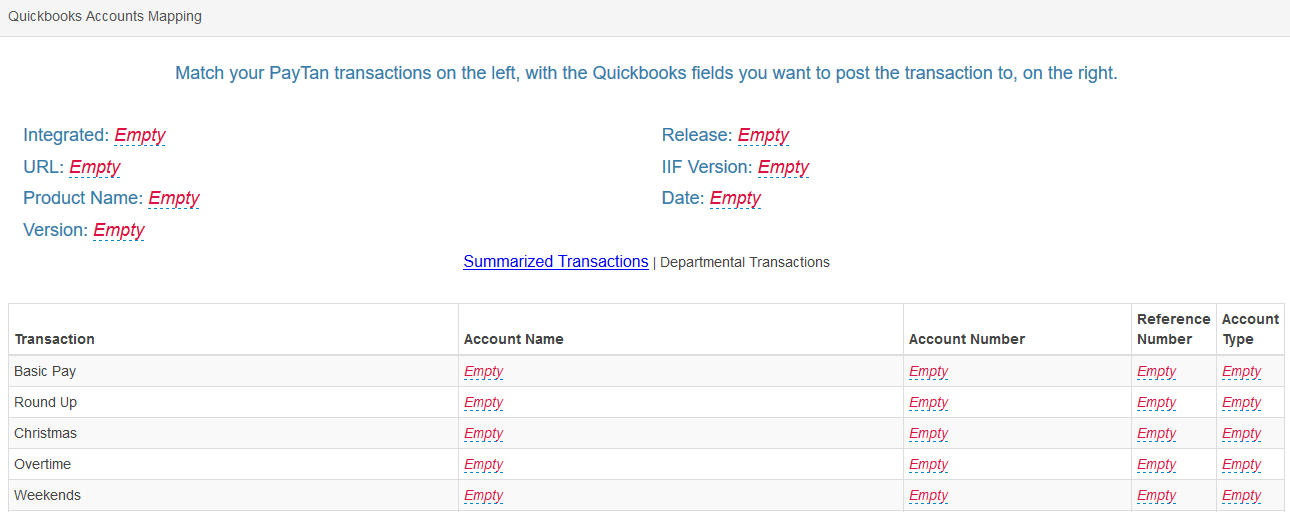
Quickbook Accounting Intergration
PayTan Integrates easily with Quickbooks Accounting Software
Click Here to match your payroll transactions with Quickbooks accounts
WebERP Accounting Interngration
PayTan Integrates easily with WebERP Accounting Software
Click Here to match your payroll transactions with WebERP accounts

AX Accoounting Intergration
PayTan integrates easily with AX Accounting Software
Click Here to match your payroll transactions with AX accounts

M: Pay Slips
Click Edit to setup the display of the Payslip information on the PDF.
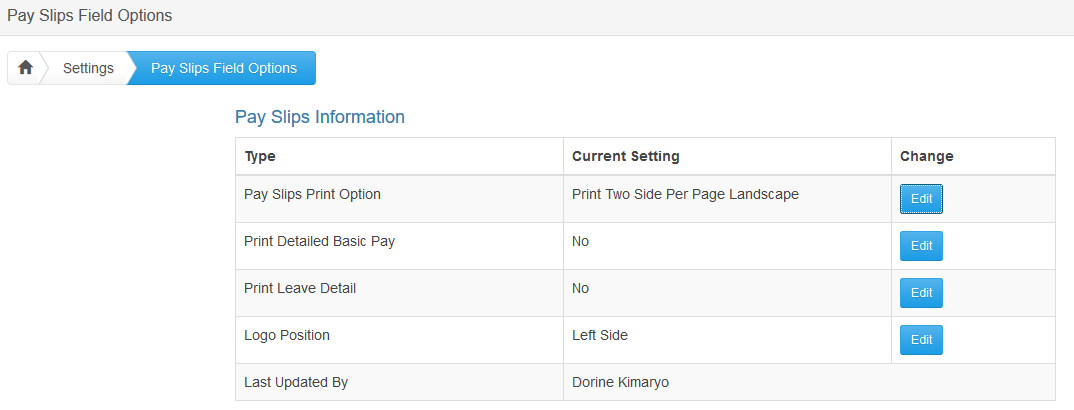
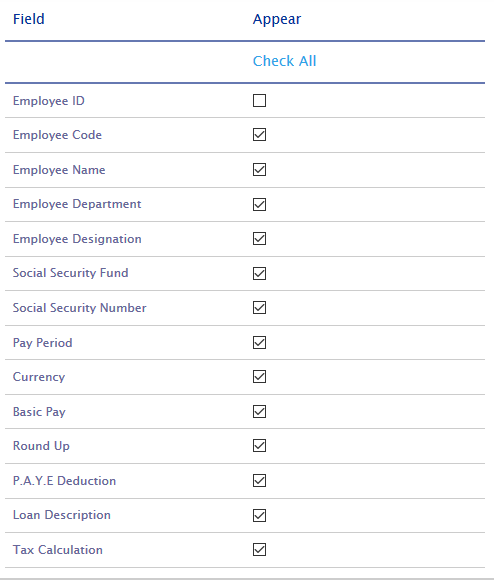
Set Up Field Options
You can set up which fields you want to appear when you print Pay Slips.
Click Check All if you wantallthe optionsto appear.
Click Save to save your changes if any.
N: E-mail Preference
This helps you to set sending e-mails to privilaged users according to the terms of your company
- Set the Term(Days or Months) of notifing an employee before the due date of a contract.
- Set the Term(Days or Months) of notifing an employee before the due date of a probation.

O: Biometric Configuration
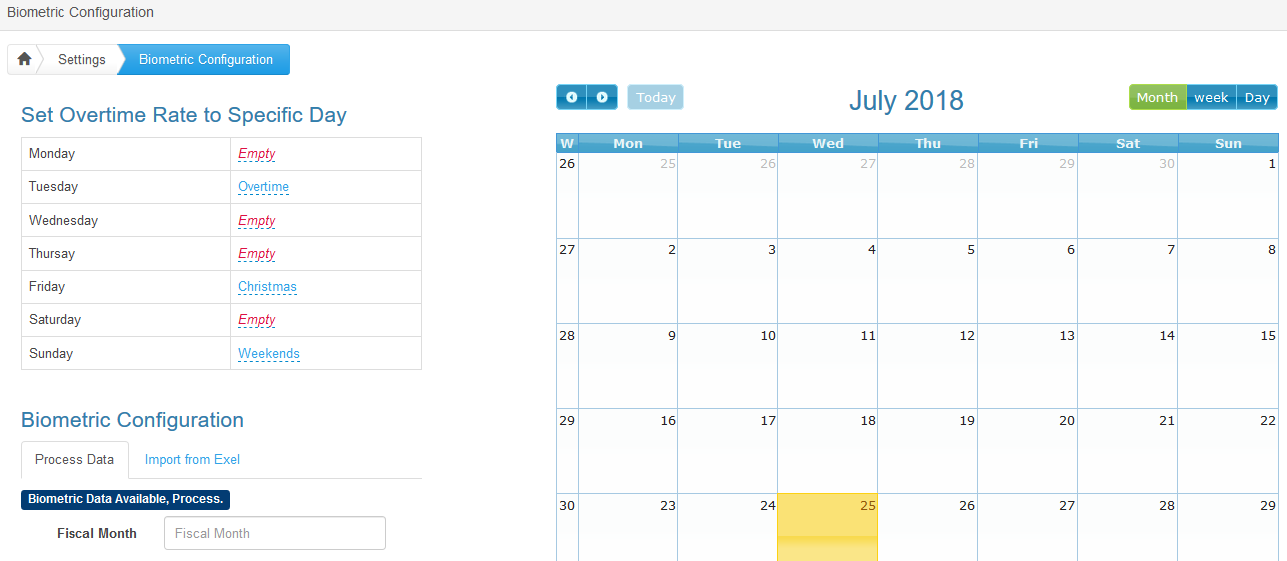
Set an overtime rate according to a specific day so as the system can compute amount according to the type of an overtime.
Process Data allows you to compute the data for a specific month and currency.
Export from Excel allows you to download a sample excel spreadsheet to fill your data manually and upload it to the system if, the system can not link with the biometric device (punch in and punch out device)
The calendar allows you to set a holiday name and overtime rate
Profile
A: Change Your Password
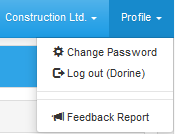
Select Profile on the far right corner of any page of the software. A dropdown menu will appear, select Change password.
Type your new password twice on the spaces New Password and Repeat Password.
Click Change Password to save changes.

B: Logout
Select Profile on the far right corner of any page of the software. A dropdown menu will appear, select Log out.
Backup And Restore
Backup
Click Click to Back upbutton to Back up your files.
Choose either Single Company or All Companies.
Note: The pop up page will close in 5 seconds.

Restore
Click Choose File (the file that you need to restore) then, Click Restore

